Anno Online Routing
Anno Online is an Online Browser based city builder Game [1] created by Ubisoft [2].
The game is played on islands. Ships are used to transport products that can be made on each of these islands.
The many ships and the many routes in the game make it not easy to maintain, because:
- In Anno Online Islands can have the same name.
- In Anno Online the name of the Ships is very difficult to distinguish from each other.
- In Anno Online the routing interface does not provide the necessary information on the route for ship and island.
- The number of ships and routes in the game require a tool because there are too many ships and routes involved.
- There is no way in the game to calculate the total number of products transported form Island X to Island Y (Matrix Grid of Products from and to Islands).
Website
So I decided to build a website to maintain the Routes: https://www.harmfrielink.nl/AnnoOnline/AnnoRoutes.php
Why create this Website?
For instance in my Anno Online game I have some 66 ships and 59 routes transporting 110 product-routes.
- In my first attempt I made an Excel SpreadSheet, but I did not liked it al all. Too much handling, too many changes on errors, because there are no validation checks on already given routes etc.
- I tried to use pivot tables in Excel, but that also did not give me a very profound result.
- Excel is not always available, for instance when I am on holiday and using an Internet Webshop Computer to access Anno Online.
I came to the conclusion that a Website with all my own thoughts would help me. And when it helps me, it also may help other players of the game. So the purpose of the Anno Online Route website [3] is to help the player in achieving the best routing for his ships and the products they transport.
Naming Ships and Routes
As earlier mentioned the interface of Anno Online makes it not easy to recognize individual ships. So the user has to be smart in the naming of the routes and ships. My suggestions are:
- Use a 4-decimal ship-number and store the type in the description of the ship-name. See below for an example:
| ShipNumber | ShipName | ShipType | TimeStamp |
|---|---|---|---|
| 4 | 0004 Small Transport | Small Transportation Ship | 2015-01-01 00:00:00 |
| 1280 | 1280 Large Trade | Large Trade Ship | 2015-01-01 00:00:01 |
- Use the same description as you use in the game in the description of the Route.
- Use the 4-decimal number for the Ship
- In the Ship Description for Ships.
- In the Route Number and Route Description for the Ship.
- See below for an example.
| ShipNumber | Island from | Island to | Description | Status |
|---|---|---|---|---|
| 0004 Small Transport | Newport | Rabenhof | 0004-Tools4Wheat | active |
- The name in the below example (0004-Tools4Wheat) indicates the kind of transport:
- From Newport Tools
- To Newport Wheat
Manual
The player gives his/her game settings for the ships, islands and routes. The program shows a matrix whith the islands and the number of items shipped from or to each island foer each product providing an insight in total and a description of the individual routes (downdirlled information).
Tabs in Anno Routes
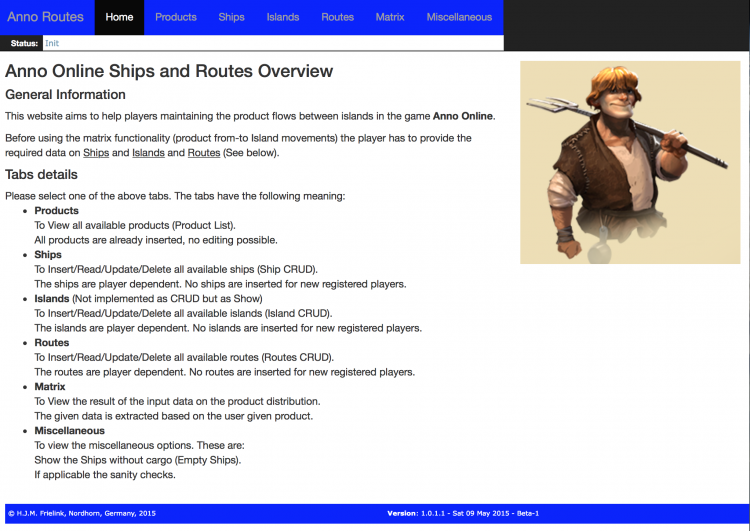
A description of the tabs in the program.
- Home
Description of the game. - Products
Shows the list of all available products in the game. The product list is maintained by the web-developer. The player can not make any chnages to the products.
Suggestion can be made by sending an <htmlet nocache="yes">AnnoRoutesMail</htmlet>. - Ships
Create, Retrieve, Update and Delete your own Ship list. - Islands
Create, Retrieve, Update and Delete your own Island list - Routes and Products per Route
Create, Retrieve, Update and Delete your own Routing list. - Matrices
Shows the results of your efforts, the combination of fro and to transports from all your islands. - Miscellaneous
Shows a list of empty ships and the sanity check on the Routing and Routing Products. - Register
Registration and maintenance of your registered information. - Login or better: Login or Logout
Log-in and log-out.
Lists in Anno Routes
Almost all tables in Anno Routes are sortable. Just click on the heading column. The column will be sorted and the arrows behind the text gives a sorting indication. By clicking again the sort is changed into another direction.
This behavior can be used to combine results of ships, islands and routes. Isn't that fun!
Help in Anno Routes
You have found this page, so you probably already know how to get here. But in case you did not know it, Help is available by clicking on the title of the website Anno Routes in the left top corner of the Webpage.
Home Tab
The home tab gives general information and a short description of the other tabs. It is the starting page of the Website and when there is news it will be shown there.
Products Tab
The product tab shows all products defined by Ubisoft in Anno Online. Since this list is the same for every player of the game no need to maintain this list for individual users. The Product List is maintained by the Webmaster.
If you want to change the list, please send an (email to the Webmaster) containing information on Why and What you like to see changed. There is no guarantee your request will be granted.
Ships Tab
Enables the user to change his/her Ship list, meaning the user can add, delete, edit his own ships. Alterations can only be made when they do not conflict with other settings. Ships that perform a route can only be deleted when they do not have any routing tasks. The user can check this by retrieving the routing information of the ship.
Please read the chapter on the Naming of the Ships and Routes. It is important to be able to match The Ships and Routes in the game and in this tool.
The Ships CRUD follows the same sequences as described by the Islands Basic CRUD. So please read that part on how to perform CRUD actions.
Islands Tab
Enables the user to maintain his islands. Islands can be added, retrieved, updated and deleted (CRUD). The islands names are (also) used in the routing (products). Therefore any change made to the islands needs to be updated in the routes.
Basic CRUD


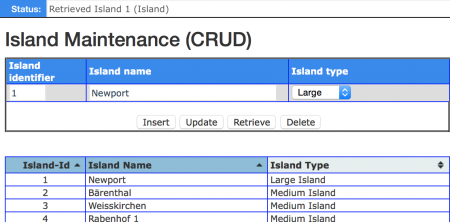
Insert islands, is the first step you have to do:
- Enter the number of the island into the Island Identifier.
- Enter the name of the island into the Island Name.
- Select the type of the island in the Island type
- Next click on the Insert button.
A list containing all your islands will be shown underneath the Input fields
Repeat these steps until all islands are entered.
Retrieve an island, always perform this action before doing a delete or update action
- Enter the number of the island into the Island Identifier.
- Next click on the Retrieve button.
If the island does not exist the status will show a red status error message (See image on the right Retrieve an island that does not exist').
Update an island:
- First enter the number of the ship (has to be in the list underneath this input field) into the Island Identifier.
- Click on the Retrieve button.
- If the record does not exist an error in red text will be shown on the left top of the screen. Do not proceed and review the error.
- If the record exists all other fields are filled
- Make your changes by altering the text-fields, but do NOT change the Island Identifier.
- After the changes click on the Update button
Delete and island
- First enter the number of the island into the Island Identifier.
- Retrieve the island by clicking the Retrieve button.
- Make sure that the island exists (See the image on the right Retrieved an island correctly).
- The status bar will show the island number that has been retrieved.
- The data in the Island Maintenance (CRUD) has been updated with the new data.
- A visual check is always available under the input fields.
If all checks are ok, then click on the Delete button.
- The input fields are not changed. This makes it easy to recover from an accidental delete action.
- In the list containing all islands the island is not shown anymore.
Routes Tab
Enables the user to maintain the Routing of his/her Ships and Products. Since this is a complicate operation the CRUD differs from the Basic CRUD.
Routing CRUD

Insert route, is the first step you have to do:
- Select the number of the ship from the combobox Ship number, i.e. 0220
- Select the island from the combobox Island from, i.e. Bärenthal
- Select the island from the combobox Island to, i.e. Newport
Please note that this has te be a different island from the island before. - In the Description enter a meaningful description which starts with the ship number and give it a meaningful text-description, i.e. 0220-Apples4Tools, which is the same in Anno Routes and in Anno Online and means:
- Ship number 220. The zero in front is necessary for the sorting in Anno-Online.
- Apples4Tools,
- Apples are shipped from Bärenthal to Newport
- Tools are shipped from Newport to Bärenthal
- Set the status to active (default value).
- Review your work and click on the Insert button.
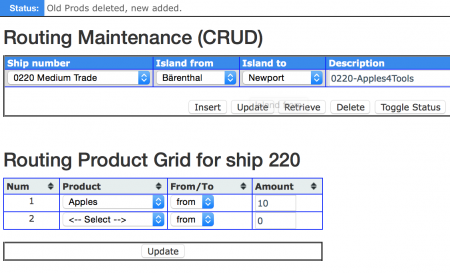
The Routing Maintenance (CRUD) will stay as it was, but the Routing Product Grid will change into Routing Product Grid for ship 220. Now you can add the products, first the apples: (See image Insert a new route).
- In the Product combobox select the product, i.e. Apples
- In the From/To combobox select the direction, i.e. From
- In the Amount type the amount, i.e 10
- Now click on the Update button under the Routing Product Grid.
The results will be:
- The Status in the top left will message Old prods deleted, new added.
- The Routing Product Grid will change and give:
- A new line where you can add new products, so:
- Under the Product on row 2, select a product, i.e. Tools.
- In the From/To combobox select the direction, i.e. To
- In the Amount type the amount, i.e 20
- And click on the Update button under the Routing Product Grid.
Again a product is added. I assume the meaningful description Apples4Tools is now obvious, send Apples and receive Tools.
Also notice that the list under Routing Product Grid is also updated.
Retrieve a Route. After inserting more routes, you can also retrieve information, do:
- Select a ship number in the Field Ship number
- Click on the Retrieve button.
If the retrieve action was successful:
- The Status on the left top will show in grey-black that the Route has been retrieved.
- The fields under the Routing Maintenance are updated with the database data.
- The fields under the 'Routing Product Grid are updated with the database data.
Update a Route"
- Always perform a Retrieve action before doing an update to be absolutely sure you have the right data loaded.
- Review the results and make the changes you wanna make into fields of the Routing Maintenance.
- Click on Update under the Routing Maintenance (and not under the Routing Product Grid).
Update a Routing Product Always perform a Retrieve action before doing an update to be absolutely sure you have the right data loaded.
- Retrieve the data from the Routing Maintenance first
- Your Rouing Product GRID should now have the right data loaded.
- Review the results and make the changes you wanna make into fields of the Routing Product Grid, i.e. change the amount.
- When finished click on Update under the Routing Product Grid.
The result will be:
- The Status should contain grey-black message Old Prods deleted, new added.
- The List should be updated with the new given data.
Delete Routing Products Always perform a Retrieve action before doing an update to be absolutely sure you have the right data loaded.
- Retrieve the data from the Routing Maintenance first
- Now change the amount into zero (0) into the rows you wanna delete.
- When finished click on Update under the Routing Product Grid.
- When you set all amount values to zero, all Routing products AND also the Route is deleted. This will be notified by a Pop-Up message. After conforming the complete records are deleted.
The result will show in the list containing all routes.
Matrices Tab
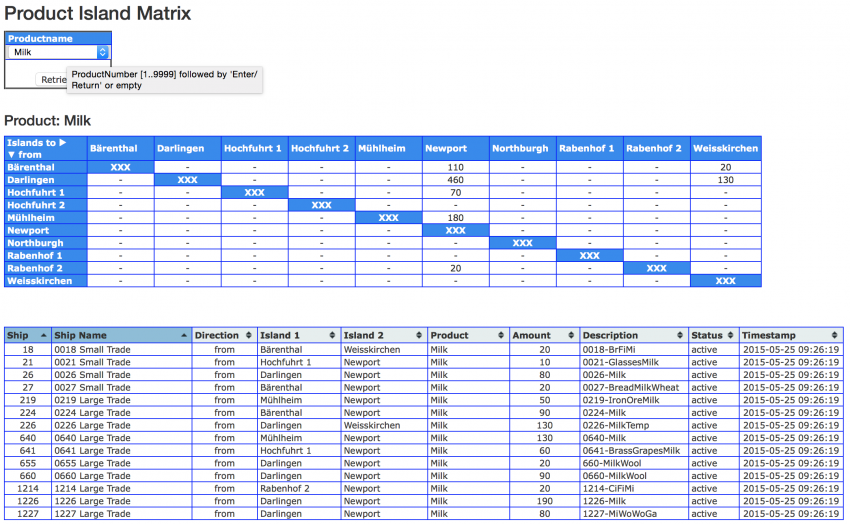
This is the tab where you are doing it all for. It gives you an overview from the product respective on the Ships and the Routes between the islands. Proceed like this:
- In the Product Island Matrix select under the Productname the requested product.
- Click on the Retrieve button
- The outcome for milk on my Anno Online environment looks like:
A short description of the matrix, or maybe better how to read the matrix and the list below:
- Bärenthal ships in total 110 milk to Newport and in detail:
- Ship 27 transports 20 Milk from Bärenthal to Newport
- Ship 224 transports 90 Milk from Bärenthal to Newport
Another example:
- Darlingen ships in total 460 milk to Newport
- Ship 26 transports 80 milk
- Ship 655 transports 20 milk
- Ship 660 transports 90 milk
- Ship 1226 transports 190 milk
- Ship 1227 transports 80 milk
Please notice the following also:
- As you can see is this example none is transported in the opposite direction (all directions are from).
- There is no circle transport. A circle tranport occurs when a product is transferred from island X to island Y and also the same product is also transferred by an other ship from island Y to island X. These kind of transports you wanna avoid!
Misc Tab
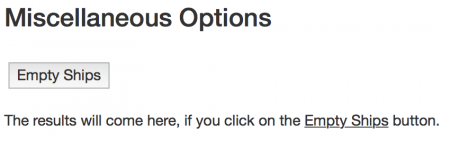
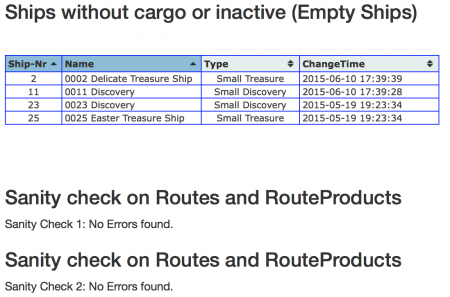
This tab has 3 purposes:
- Check for ships without any transportation task.
- All trade and transport ships without a routing task.
- All other ships that do not have the ability to transport products/goods from islands or from other players
- Runs a sanity control checking if the ships in the Routing table also have an instance in the Routing Product table.
- Runs a sanity control checking if the Products in the Routing table also have a Ship number in the Routing table.
To start these 3 tasks:
- Click on the Emty Ships button.
- The website will give a list of ships that do no have any transport task and show the sanity checks (See Anno Routes Empty ships and Sanity Checks).
Register Tab
 |
Registration is necessary because users have to be able to create their own instances for Ships, Island and Routes without interfering each other. There are 3 mandatory fields indicated by the asterix (*) behind the label field:
- User name enables a unique identification for the user. The username is stored
- User password is stored as a salted md5 password. This means that the website owner does not know the password because it is encrypted stored in the database.
- Email address is used for sending a confirmation of the registration. Only after confirmation the user can log-in.
At this moment the user can not:
- Change his/her password when registered. This option will be available in the near future.
- If the user forgets his password, there is no way to retrieve your password. The user password in the database is encrypted and is therefore also unknown for the webmaster. The user has to wait for this feature to come alive.
- Restore a deleted/cancelled registration. If the user wants to restore, he/she will need to send an email to the webmaster (with your login name).
Insert a new Register"
- Enter the user name in the User name field. The user name is at least 4 characters and not longer than 15 characters and must start with an Alpha char (A-z). After the first char you may use alphanumeric characters.
- Enter the user password in the User password field. The user password is at least 6 character and not longer than 35 characters and must start with an Alpha character (A-z). After the first char you may use alphanumerical characters and/or special tokens #$&.
- Enter you email address in the Emil address field. The email has to be valid, because it is used for the confirmation and may exist on alphanumerical character in combination with a point (.).
- Review the entered data and click on Insert button.
- The Status field shows the result Inserted UserName xxxx with token in case of success, and a red message in case of an error.
- A notification informs the user that a confirmation email has been sent. See Confirmation email for more details on handling this email.
Retrieve and existing User.
- Enter an existing user name in the User name field.
- Enter the user password in the User password field.
- Click on the Retrieve button.
- Verify the result, the Status field should indicate in grey-black Retrieved XXXX (id=YYYY) from User. Password has been blanked for security! where XXXX= Username and YYYY=Id number.
- If something goes wrong the Status field shows an error message in red.
Update an existing Registration (only possible if you are logged-in):
- Before an update always retrieve the userdata using the retrieve user.
- You may change except the username and/or the user password. (maybe this feature will be made in the future, but don't count on that).
- Please notice you'll have to give the existing password again to make an update.
- Click on the Update button
- Verify the result, the Status field should indicate in grey-black Updated User XXXX (User) id=YYYY where XXXX= Username and YYYY=Id number.
- If something goes wrong the Status field shows an error message in red.
Deleting an existing user. Before ypu can delete an existing user, all data of that user should be deleted in Ships, Island and Routes. If any record is still available no deletion cab be made.
- Before deleting always retrieve the userdata using the retrieve user.
- Please notice you'll have to give the existing password again to delete a record
- Verify the result, the Status field should indicate in grey-black Updated User XXXX (User) id=YYYY where XXXX= Username and YYYY=Id number.
- If something goes wrong the Status field shows an error message in red.
Login tab
This tab has 2 occurrences:
Login
 |
If you wanna login:
- Enter your existing and confirmed Username under Login-name
- Enter your Userpassword under Login-password
- Press the Enter key
- If your credentials are ok, the Home tab-screen shows with your Login-name behind the LoginId.
- if your attempt fails the Home tab-screen shows with No-UserId behind home the LoginId.
Logout
 |
If you wanna logout:
- Click on the Yes if you want to logout.
- Click on the No if you don't want to logout.
- If you have choosen for the logout option the Home tab-screen shows with with No-UserId behind home the LoginId.
- If you have choosen not to logout the Home tab-screen shows with your Login-name behind the LoginId.
Questions and/or unforeseen errors
If you have questions or encounters unforeseen errors please do not hesitate and send me an <htmlet nocache="yes">AnnoRoutesMail</htmlet> with in the Subject at least the text Anno Routes. If you encounter questions please provide me at least with:
- Your login-name
- Description of what you were doing or trying to do
- Make a screen shot of the error
I answer all questions as soon as I can (not as possible).
Confirmation email
After your initial registration you receive a confirmation mail.
See also
- AO Forum Anno online Forum
Reference
- ↑ Anno Online, English version of the Game.
- ↑ Ubisoft, is a leading creator and distributor of entertainment software..
- ↑ AnnoRoutes, tool on my private webserver.