Tutorial Maven Spring: Difference between revisions
mNo edit summary |
|||
| Line 44: | Line 44: | ||
{| class="wikitableharm" width="1150" | {| class="wikitableharm" width="1150" | ||
|- style="vertical-align:top;" | |- style="vertical-align:top;" | ||
| width="575" | [[File:Eclipse-New-Dynamic-Web-Project.png|thumb|left|550px| 1. Open > New > Dynamic | | width="575" | [[File:Eclipse-New-Dynamic-Web-Project.png|thumb|left|550px| 1. Open > New > Dynamic Web Project]] | ||
Settings for the project (See right image) | Settings for the project (See right image) | ||
# Apache Tomcat v8.0 | # Apache Tomcat v8.0 | ||
| Line 200: | Line 200: | ||
* Package: com.crunchify.controller | * Package: com.crunchify.controller | ||
* Filename: CrunchifyHelloWorld.java | * Filename: CrunchifyHelloWorld.java | ||
{| class="wikitableharm" width="1150" | |||
|- style="vertical-align:top;" | |||
| width="575" | [[File:Crunch-DWP-060.png|thumb|left|550px| 1. Creates the Controller Class]] | |||
| width="575" | | |||
<pre> | |||
</pre> | |||
|} | |||
Revision as of 10:51, 27 February 2015
Tutorials help the developer in exploring how application can be made. The tutorials here presented try to to do that too. The examples are from various parts of the Internet and are always presented with reference to the original side.
To understand the presented examples pre-required knowledge is necessary on:
- Language Java JDK 1.8 and JEE
- Build tool Maven (Version 3 or better)
- IDE Eclipse (Luna or better)
- with JEE
- and m2eclipse Apache Maven plug-in.
- Web Container Tomcat (8.0 or better)
- Spring MVC
- AJAX tool jQuery (1.8 or better)
Basic Maven Tomcat Deployment
Procedure will help you create a new web application using the m2eclipse Apache Maven plugin for Eclipse, and then deploy and run it on the Tomcat server defined in your Eclipse IDE [1].
- In Eclipse, create a new Maven Project. File > New > Other... > Maven Project.
- Accept the first Screen, choose Next
- In the second Screen find and select the maven archetype called maven-archetype-webapp,
[ToDo Finish this example with pictures and annotations.]
Hello World
Tutorial for Spring MVC HelloWorld Using Maven in Eclipse [2].
Java developers often rely on examples to learn Spring framework. Simple examples are often a key learning resource. There are many Spring MVC HelloWorld applications. However, most of them are outdated (do not integrate Maven, use old version of Spring, etc) or not complete (missing key steps or file hierarchy view). All steps for creating a Spring MVC HelloWorld application using Maven in Eclipse are illustrated with as much details as necessary.
Prerequisite are installed versions of:
- Java 7 or higher
- Eclipse Kepler Java EE
- Tomcat 7 or higher
[ToDo Finish this example with pictures and annotations.]
Hello World II
Tutorial of Crunchify [3] to create the most simple Hello World with the pre required tooling:
- Tomcat 7.0.56 or Higher
- Eclipse IDE Luna Service Release 1 v4.4.1 or higher (don'y forget the JEE
- Spring 4.1.1 (No download required)
- Java JDK 1.7 or higher
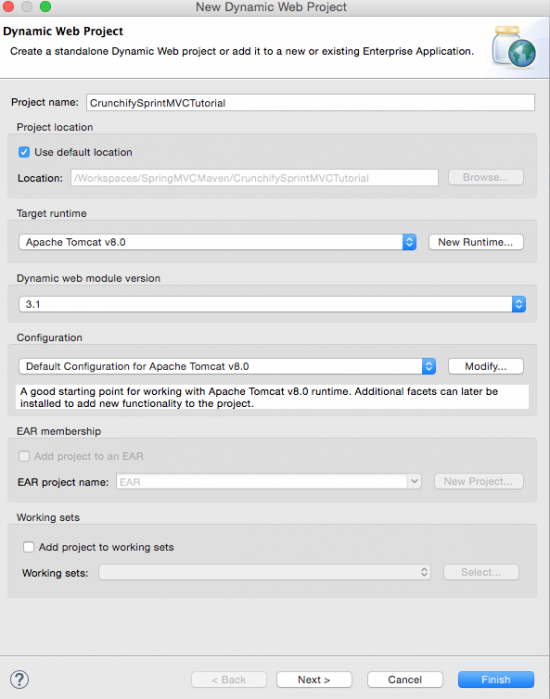
Step 1: Open Eclipse and Create Dynamic Web Project CrunchifySpringMVCTutorial.
 Settings for the project (See right image)
|
 |
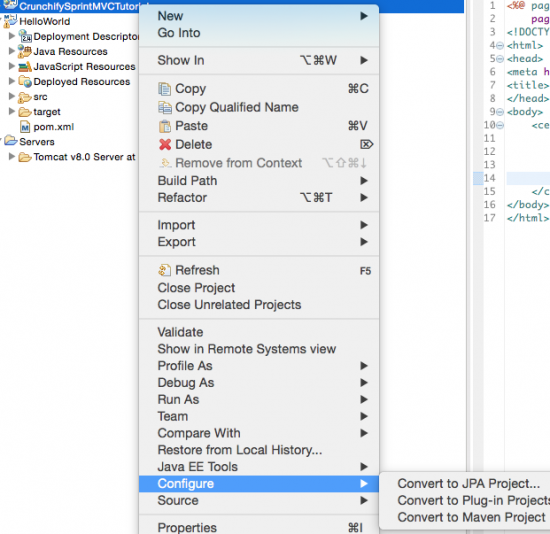
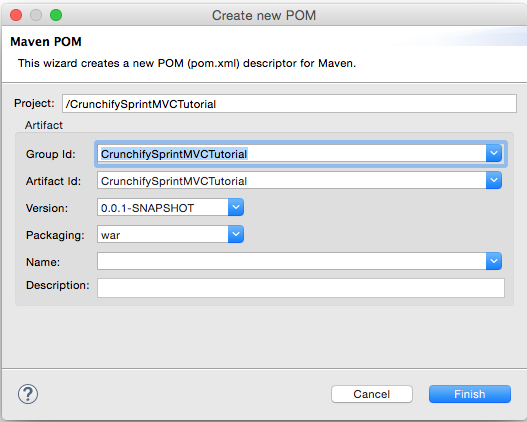
Step 2: Convert Project to a Maven Project
Right click on the project and Choose
 |
 |
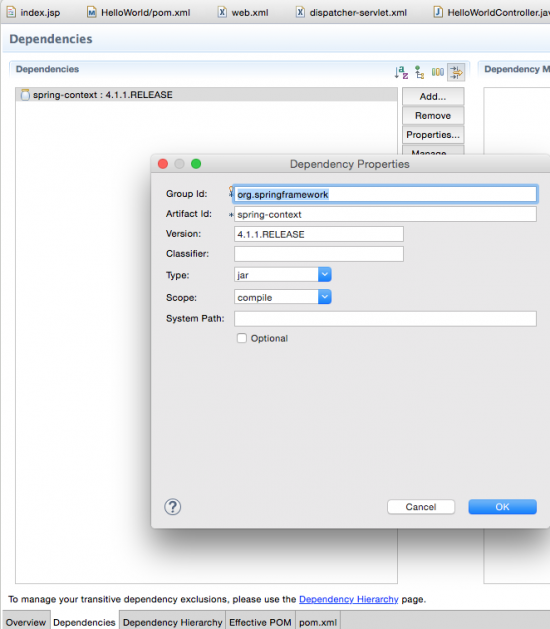
Step 3: Add Spring Dependencies
 |
 |
I have uodated the version to 4.1.5 release of Spring. Your POM file should look like:
<project xmlns="http://maven.apache.org/POM/4.0.0" xmlns:xsi="http://www.w3.org/2001/XMLSchema-instance" xsi:schemaLocation="http://maven.apache.org/POM/4.0.0 http://maven.apache.org/xsd/maven-4.0.0.xsd">
  <modelVersion>4.0.0</modelVersion>
  <groupId>CrunchifySprintMVCTutorial</groupId>
  <artifactId>CrunchifySprintMVCTutorial</artifactId>
  <version>0.0.1-SNAPSHOT</version>
  <packaging>war</packaging>
  <build>
    <sourceDirectory>src</sourceDirectory>
    <plugins>
      <plugin>
        <artifactId>maven-compiler-plugin</artifactId>
        <version>3.1</version>
        <configuration>
          <source>1.8</source>
          <target>1.8</target>
        </configuration>
      </plugin>
      <plugin>
        <artifactId>maven-war-plugin</artifactId>
        <version>2.4</version>
        <configuration>
          <warSourceDirectory>WebContent</warSourceDirectory>
          <failOnMissingWebXml>false</failOnMissingWebXml>
        </configuration>
      </plugin>
    </plugins>
  </build>
  <dependencies>
  	<dependency>
  		<groupId>org.springframework</groupId>
  		<artifactId>spring-context</artifactId>
  		<version>4.1.5.RELEASE</version>
  	</dependency>
  	<dependency>
  		<groupId>org.springframework</groupId>
  		<artifactId>spring-aop</artifactId>
  		<version>4.1.5.RELEASE</version>
  	</dependency>
  	<dependency>
  		<groupId>org.springframework</groupId>
  		<artifactId>spring-webmvc</artifactId>
  		<version>4.1.5.RELEASE</version>
  	</dependency>
  	<dependency>
  		<groupId>org.springframework</groupId>
  		<artifactId>spring-web</artifactId>
  		<version>4.1.5.RELEASE</version>
  	</dependency>
  	<dependency>
  		<groupId>javax.servlet</groupId>
  		<artifactId>jstl</artifactId>
  		<version>1.2</version>
  	</dependency>
  	<dependency>
  		<groupId>commons-logging</groupId>
  		<artifactId>commons-logging</artifactId>
  		<version>1.1.3</version>
  	</dependency>
  </dependencies>
</project>
Step 4: Create Spring Configuration Bean
<?xml version="1.0" encoding="UTF-8"?>
<beans xmlns="http://www.springframework.org/schema/beans"
	    xmlns:xsi="http://www.w3.org/2001/XMLSchema-instance" xmlns:p="http://www.springframework.org/schema/p"
	    xmlns:context="http://www.springframework.org/schema/context"
	    xsi:schemaLocation="http://www.springframework.org/schema/beans
                                              http://www.springframework.org/schema/beans/spring-beans-4.0.xsd
                                              http://www.springframework.org/schema/context
                                              http://www.springframework.org/schema/context/spring-context-4.0.xsd">

	<context:component-scan base-package="com.crunchify.controller" />

	<bean id="viewResolver" class="org.springframework.web.servlet.view.UrlBasedViewResolver">
		<property name="viewClass" value="org.springframework.web.servlet.view.JstlView" />
		<property name="prefix"       value="/WEB-INF/jsp/" />
		<property name="suffix"        value=".jsp" />
	</bean>
</beans>
Creates Spring Configuration Bean file /WEB-INF/crunchify-servlet.xml.
In the above crunchify-servlet.xml configuration file, we have defined a tag <context:component-scan>.
- This will allow Spring to load all the components from package com.crunchify.controller and all its child packages.
- This will load our CrunchifyHelloWorld.class.
Also we have defined a bean viewResolver.
- This bean will resolve the view and add prefix string /WEB-INF/jsp/ and suffix .jsp to the view in ModelAndView.
Note that in our CrunchifyHelloWorld class, we have return a ModelAndView object with view name welcome. This will be resolved to path /WEB-INF/jsp/welcome.jsp .
Step 5: Map Spring MVC in /WEB-INF/web.xml
If you do not have a /WEB-INF/web.xml you can generate one by:
- Right mouse click on the project in the navigator.
- Choose Java EE Tools > Genrate Deployment Descriptor.
<?xml version="1.0" encoding="UTF-8"?>
<web-app xmlns:xsi="http://www.w3.org/2001/XMLSchema-instance"
         xmlns="http://java.sun.com/xml/ns/javaee"
         xsi:schemaLocation="http://java.sun.com/xml/ns/javaee http://java.sun.com/xml/ns/javaee/web-app_3_0.xsd" version="3.0">

	<display-name>CrunchifySpringMVCTutorial</display-name>
  	<welcome-file-list>
    	<welcome-file>index.jsp</welcome-file>
  	</welcome-file-list>

    <servlet>
        <servlet-name>crunchify</servlet-name>
        <servlet-class>
            org.springframework.web.servlet.DispatcherServlet
        </servlet-class>
        <load-on-startup>1</load-on-startup>
    </servlet>
    <servlet-mapping>
        <servlet-name>crunchify</servlet-name>
        <url-pattern>*.html</url-pattern>
    </servlet-mapping>

</web-app>
The above code in web.xml will map DispatcherServlet with url pattern *.html. Also note that we have define index.jsp as welcome file.
One thing to note here is the name of servlet in <servlet-name> tag in web.xml.
Once the DispatcherServlet is initialized, it will looks for a file name [servlet-name]-servlet.xml in WEB-INF folder of web application.
In this example, the framework will look for file called crunchify-servlet.xml.
Step 5: Create the Controlller Class
Create Controller Class.
- Package: com.crunchify.controller
- Filename: CrunchifyHelloWorld.java
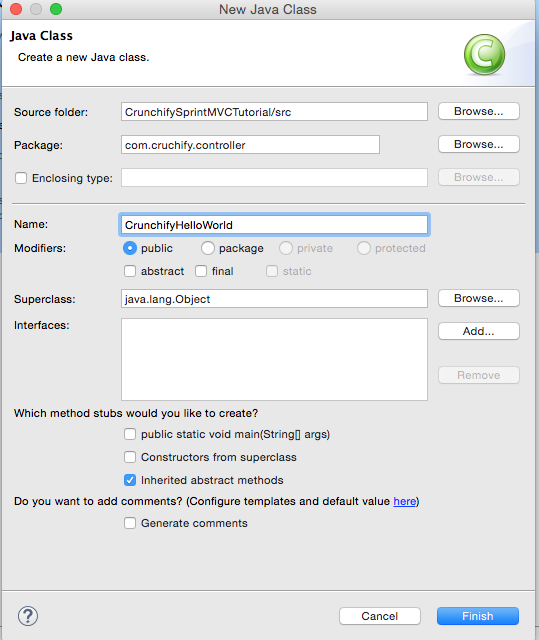 |
[ToDo Finish this example with pictures and annotations.]
AJAX with Sprint MVC
See also
- Projects Spring IO, Spring Framework.