Authentication
Security is an issue and it will remain an issue. It is a constant race between the hackers and the (security) developers. First you'll need something to be sure all toy data is save using an SSL connection. Then authentication.
HTTPS
- Go Daddy, SSL Certificates.
- Comodo.com, One.com uses Comodo SSL Certificates.
- DigiCert
- GeoTrust
- GlobalSign
- VeriSign
Authentication steps
The idea is taken from 'the Buzz Media' [1]: Client:
- Before making the REST API call, combine a bunch of unique data together (this is typically all the parameters and values you intend on sending).
Do not forget to add the client's IP-address. - Hash (HMAC-SHA1 or SHA256 preferably) the blob of data data (from Step #1) with your private key assigned to you by the system.
- Send the server the following data:
- Some user-identifiable information like an “API Key”, client ID, user ID or something else it can use to identify who you are.
This is the public API key, never the private API key. This is a public value that anyone (even evil masterminds can know and you don’t mind). It is just a way for the system to know WHO is sending the request, not if it should trust the sender or not (it will figure that out based on the HMAC). - Send the HMAC (hash) you generated.
- Send all the data (parameters and values) you were planning on sending anyway. Probably unencrypted if they are harmless values, like “mode=start&number=4&order=desc” or other operating nonsense. If the values are private, you’ll need to encrypt them.
- Some user-identifiable information like an “API Key”, client ID, user ID or something else it can use to identify who you are.
- Optional but handy: Always send a timestamp.
Server:
- Receive all the data from the client.
- Optional compare the current server’s timestamp to the timestamp the client sent. Make sure the difference between the two timestamps it within an acceptable time limit (5-15mins maybe) to hinder replay attacks.
- Using the user-identifying data sent along with the request (e.g. API Key) look the user up in the DB and load their private key.
- Re-combine the same data together that the client did in the same way the client did it. Then hash (generate HMAC) that data blob using the private key you looked up from the DB.
- If you are protecting against replay attacks, include the timestamp from the client in the HMAC re-calculation on the server.
Since you already determined this timestamp was within acceptable bounds to be accepted, you have to re-apply it to the hash calculation to make sure it was the same timestamp sent from the client originally, and not a made-up timestamp from a man-in-the-middle attack.
- If you are protecting against replay attacks, include the timestamp from the client in the HMAC re-calculation on the server.
- Run that mess of data through the HMAC hash, exactly like you did on the client.
- Compare the hash you just got on the server, with the hash the client sent you; if they match, then the client is considered legit, so process the command.
Otherwise reject the command!
Token Based
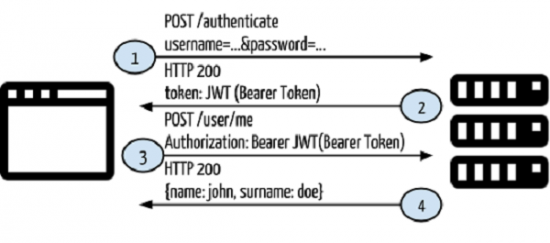
It will use the following flow of control:
- The user provides a username and password in the login form and clicks Log In. Requires a POST Rest Service on the Server (/authenticate).
- After a request is made, validate the user on the backend by querying in the database.
- If the request is valid, create a token by using the user information fetched from the database, and then return that information in the response header so that we can store the token browser in local storage.
- If the request is invalid, response a HTTP Status code 401 Unauthorized.
- Provide token information in every request header for accessing restricted endpoints in the application.
- If the token fetched from the request header information is valid, let the user access the specified end point, and respond with JSON or XML.
JWT stands for JSON Web Token and is a token format used in authorization headers.
This token helps you to design communication between two systems in a secure way.
Let's rephrase JWT as the bearer token.
A bearer token consists of three parts:
- Header
The header is the part of the token that keeps the token type and encryption method, which is also encrypted with base-64. - Payload
The payload includes the information. You can put any kind of data like user info, product info and so on, all of which is stored with base-64 encryption. - Signature
The signature consists of combinations of the header, payload, and secret key. The secret key must be kept securely on the server-side. You can see the JWT schema and an example token below;
Example codebase is provided at github.com/firebase/php-jwt.
See also
- HaFr Authentication & Authorization, How is the Authorization implemented on the HaFr Websites. An overview. Only for me (sorry).
- REST, Webservices using REST (GET and POST).
- Webservices, SOAP and REST
Reference
- ↑ The Buzz Media, Designing a secure REST API without oath authentication.
